sábado, 6 de junho de 2015


Knee Strengthening Exercises


Knee strengthening exercises are one of the best ways to cure knee pain. People who do them have less pain, recover quicker from injuries, function better and have less chance of problems recurring in the future.
Knee strengthening exercises can be used to help relieve and sometimes even prevent various causes of knee pain. Whenever there is weakness in the leg muscles, it means the knee joint is less well supported, resulting in more weight going through the bones, therefore making knee problems much more likely.

Where To Start

There are so many different knee strengthening exercises out there, it can be hard to know where to start. Here I share with you my favourite exercises grouped by muscle – easy to perform, quick, effective and suitable for most people.
1) Quads Strengthening: Front thigh muscles that straighten the knee
2) Hamstring Strengthening: Back thigh muscles that bend the leg
3) Glutes Strengthening: Buttock muscles play a crucial role in controlling then knee
4) Calf Strengthening: Lower leg muscles that control the foot
5) Combination Strengthening: Strengthen all the muscle groups at once
6) Balance Training: How to improve your balance
Pick and choose the ones you find challenging but not painful. If they are too easy for you, visit the Intermediate and Advanced knee strengthening exercise sections.
To find out how to exercise safely and effectively, visit the sections on How to Exercise Right and Getting the Best Results from your knee strengthening exercises.

Quads Knee Strengthening Exercises

These are the muscles at the front of the thigh that straighten the knee. Weak quads is one of the most common causes of pain making quads knee strengthening exercises an important part of any rehab programme.

1) Quad Clenches

Purpose: Maintain and strengthen the Quads without moving the knee, enable full straightening of the knee

Starting position: Lying flat on your back or sitting up. Leg and knee straight
Action: Tighten the muscle on the front of the thigh by pushing your knee down. You should feel your thigh muscles clench. Hold for 3 secs
Repetition: Repeat 10-20x every 3-4 hours
Variations: If you are struggling to get your knee to straighten fully, place a rolled up towel underneath the ankle so that your leg is lifted slightly on the bed. Then do the exercise as described. Lifting the knee up slightly lets gravity help the knee to straighten

2) Short Arcs

Purpose: Strengthen the quads muscles without much knee movement


Short arcs: Knee strengthening exercise. Approved Use by HEP2go.com


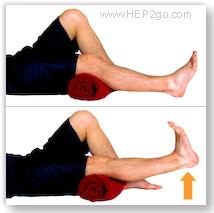
Starting position: Lying flat on your back or sitting up with your leg horizontal on a flat surface such as a bed. Place a rolled up towel (approx 10cm diameter) under the knee.
Action: Pull your toes towards you and clench you thigh muscles. Slowly lift your foot up off the bed until your knee is straight (keep your knee resting on the towel). Hold for 3-5 secs and slowly lower
Repetition: repeat 10-20 times, 3x daily
Progression: 1) Increase the size of the towel under the knee 2) Add a weight e.g. by wearing a shoe, or using a light ankle weight. Progress further by using a heavier weight


3) Straight Leg Raise

Purpose: Strengthen the Quads muscles without bending the knee NB Do not do this if you have a history of back problems


Starting position: Lying flat on your back. Leg and knee to be worked straight, other leg bent
Action: Pull your toes towards you and tighten/clench the muscle on the front of the thigh, locking your knee straight. Lift your foot up about 6 inches off the bed. Hold for 3-5 secs and slowly lower. Ensure your knee stays straight the whole time
Repetition: repeat 10-20 times, 2x daily
Progression: 1) Add a weight e.g. by wearing a shoe


4) Long Arcs

Purpose: Strengthen quads, increase knee mobility, great to do anytime sitting for prolonged periods (30mins+) to stop the knee getting stiff - 


Starting position: Sitting on a firm chair with your knee bent and your foot on the floor
Action: Lift your foot up and straighten your knee as much as possible. Hold for 3-5 secs and slowly lower
Repetition: 5-20 times, 3xdaily
Progression: Strengthen further by adding an ankle weight 

5) Knee Marching


Purpose: Increase quads strength without putting weight through the knee join

Starting Position: Sit in a chair with your feet on the floor
Action: March your legs up and down one at a time. Lift your knee and foot up and then back down
Repetition: Repeat for about 1 minute, 2x daily and any time you are sitting for more than 20 minutes to stop your knee getting stiff
Progression: Add a weight 

Hamstring Strengthening Exercises

The hamstrings are the muscles on the back of the thigh that bend the knee. You need a good combination of strength and length in the muscles.  These hamstring knee strengthening exercises are a great place to start.

1) Hamstrings Clenches

Purpose: Strengthen the hamstrings muscles without having to move the knee 


Starting Position: Sit in a chair with your heel against the leg of the chair and your feet firmly on the floor
Action: Press your heel firmly backwards into the chair leg feeling the back of your thigh tightening/clenching. Hold for 3-5 secs
Repetition: Do 10-20x, 2x daily
Note: The foot shouldn’t move during this exercise

2) Buttock Kicks

Purpose: Strengthen hamstrings without any weight going through the knee joint, increase knee mobility (flexion), aid circulation


Starting position: Lie on your tummy (on the floor or bed) with your legs straight
Action: Lift your foot off the floor and bring it towards your bottom as far as you can. Slowly return to the starting position
Repetition: Repeat 10-25x, 3x daily
Notes: 1) You are aiming to get your heel all the way to your bottom 2) Make the exercise easier by hooking your good leg underneath the bad and using it to help lift the bad leg up
Progression: Add a weight e.g. a shoe or ankle weight

3) Kick Backs

Purpose: Improve the strength of hamstrings and mobility of the knee


Starting Position: Stand up straight holding on to something stable e.g. chair or table
Action: Lift your foot up as far as you can towards your bottom, bending the knee. Hold for 3-5 secs
Repetition: Do 5-25 times, 2x daily 

Progression:
 Add a weight e.g. shoe or ankle weight
Note: 1) Don’t bend forwards - keep your body upright 2) keep your knees in line with each other- don’t let your thigh come forwards

4) The Bridge: Stage 1

Purpose: Excellent knee strengthening exercises for the hamstrings,


Starting Position: Lie on your back with both knees bent about 90° and your feet on the floor/bed
Action: Clench your buttocks and lift your bottom off the bed as high as you can without arching your back. Hold for 3-5 seconds and slowly lower
Repetitions: Repeat 10-25 times, 1-2x daily
Note: 1) Keep your back straight – don’t let it arch as you lift up, it should be your bottom doing the work 2) Don’t hold your breath – keep breathing normally

Glutes Knee Strengthening Exercises 

These are the buttock muscles, vital for ensuring the forces go through the knee evenly. The glutes are often forgotten about in knee strengthening exercises. Virtually everyone who suffers from knee pain has weak glutes, so they are well worth doing.

1) Buttock Clenches

Purpose: Maintain and strengthen the Glutes without the knee moving


Starting position: Lying down or sitting up.
Action: Clench your buttocks together and hold for 3 seconds. You should feel yourself rise up slightly
Repetition: Repeat 10-20x every 3-4 hours

2) The Clam

Purpose: Strengthen the glutes to help support the knee and prevent excessive weight going through the inner side of the knee – a must for anyone with knee pain! 


Starting position: Lie on your side with your hip and knees bent approx 90°, feet together.
Action: Keeping your feet together, lift the top knee up as high as you can. Hold for 3 seconds and slowly lower
Repetition: Repeat 10-25x on each side, 2x daily
Note: Do not let your top hip roll backwards

Calf Strengthening Exercises

The calf muscles can be found on the back of the leg between the knee and the ankle. The move the foot and ankle, and help support the knee so should always been included with knee strengthening exercises.

1) Heel Raises

Purpose: Strengthen the calf muscles to help support the knee

Starting position: Stand with your feet slightly apart, weight equally distributed, holding onto something solid for balance 
Action: Rise up onto your toes lifting your heels as high as possible. Keep your body upright (don’t bend forwards). Hold for 3-5 secs and slowly lower
Repetition: Repeat 10-30 times, 2x daily

Combination Knee
Strengthening Exercises

Here you will find knee strengthening exercises that work two or three muscle groups at the same time.

1) Sit to Stand

Purpose: improve knee mobility, strengthen quads and glutes, improve general fitness


Starting position: Sit in a firm chair, feet on the floor
Action: Lean forwards, lift your bottom and stand up straight and then sit back down
Repetition: Repeat 10-30x
Notes: 1) You can make this exercise easier by pushing up through your arms too 2) The higher the chair, the easier the exercise
Progression: 1) Don’t use your arms 2) Use a lower chair 3) Increase the speed you do the exercise at 4) Hold a heavy weight – e.g. bag of books during the exercise

Balance / proprioception is really important to prevent knee injuries, and is often reduced with knee arthritis. As a quick test to see whether you would benefit from balance knee strengthening exercises try standing on one leg with your eyes closed. If you can’t do it for one minute, you would benefit from this exercise. This exercise helps your body learn the subtle adjustments needed for good balance.
One Leg Standing: Knee strengthening exercise. Approved Use by HEP2go.com

1) One Leg Standing: Stage 1 

Starting position: Standing near a wall or chair for support
Action: Lift up your good leg and stand on one leg for as long as you can.  It is normal to wobble a bit
Repetition: Spend 5 minutes doing this 2x daily e.g. when brushing your teeth
Progression: 1) Close your eyes and perform the exercise as above - you'll be surprised how much harder it is


What Next?

As your muscles get stronger, you will be able to increase the number of repetitions of each of these knee strengthening exercises.
You will probably need to do knee strengthening exercises at least four times a week for about a month before you notice much change in your knee pain. 
When you feel ready, strengthen your muscles further by progressing on the intermediate and advanced knee strengthening exercises.
- See more at: http://www.knee-pain-explained.com/knee-strengthening-exercises.html#sthash.hxrnffJL.dpuf
Knee Cap Exercises

for Patellar Maltracking


Knee cap exercises can be really helpful in reducing knee pain.  They strengthen the VMO muscles (Vastus Medialis Oblique) around the patella improving how the kneecap moves.
The VMO muscles are part of the quadriceps muscles and are found on the inner side of the knee. Their job is to control the kneecap movement, known as patellar tracking. They hold the kneecap in the middle of the patellar groove so it glides smoothly during any leg movement.
If the kneecap muscles are weak, the kneecap shifts slightly to the outer side of the knee. This prevents it from moving properly, known as patellar maltracking, which leads to pain and irritation. Knee cap pain is common and is often caused by conditions such as Runners Knee and Chondromalacia Patella.

Why Do Knee Cap Exercises?

The VMO muscles should be working the whole time when the knee moves, but if there is knee pain or there has been a kneecap injury such as a dislocation, they often switch off and stop working properly. Regular quads strengthening exercises e.g. squats and lunges, don’t specifically target the VMO muscles. They need to be strengthened in a slightly different way.
Here you will find some easy to perform yet effective knee cap exercises for the VMO muscles. They will improve your patellar tracking and the stability of your knee. 

Finding the Knee Cap Muscles

The VMO knee cap muscles are extremely important for controlling how the patella moves
Before you can strengthen the knee cap muscles, you need to know how to make sure they are working.
Sit comfortably in a chair and put your fingers at the top of your kneecap. Move your fingers up an inch, and inwards an inch so you are on a soft fleshy bit – this is the VMO. Push your knee and foot down into the floor and you should feel the muscle tighten/clench under your fingers.
It might take a few goes before you feel this – keep practising. When you are doing any of the knee cap exercises below, keep checking that you can feel the VMO muscles working.

Knee Cap Exercises

Once you are happy that your VMO muscles are working, you can start doing these exercises. Get the hang of stages 1 and 2 before moving on to stage 3.

1) VMO Stage 1

Starting Position: Sit in a chair, feet hip width apart with a soft football in between your knees
Knee Cap Exercises.  Approved use by www.HEP2go.com
Action: Clench your buttocks, clench your knees and gently squeeze the ball with your knees. Hold for 3-5 secs and relax
Repetition: Repeat 10-20x, 2x daily
Tips: 1) Feel for the VMO muscle tightening with your fingers
2) When you squeeze the ball, make sure the squeezing movement comes from your knees, not your hips

2) VMO Stage 2

Starting Position: Lying on your back with a pillow under your knees so knees are bent 30°. Feet hip width apart with a soft football in between your knees
Action: Squeeze the football as with stage 1 ex (clench buttocks and knee muscles) and then lift the foot of the weak leg up off the bed, straightening the knee. Hold for 3 secs, slowly lower the leg and finally relax the knee.
Repetition: Repeat 10-20x, 2x daily
Note: Ensure that you keep squeezing the ball throughout the exercise – keep the knee and buttock clench going throughout.
2) Keep the knee resting on the pillow – do not lift it up

3) VMO Stage 3

Starting Position: Stand with your back against the wall, feet hip width apart about 10cm away from the wall. Place a soft football in between your knees
Action: Squeeze the ball as with stage 1 & 2 (clench knees and buttocks) and then slowly squat down as far as comfortable. Hold for 3 secs and come back up
Repetition: Repeat 10-20x, 2x daily
Progression: Progress the exercise by gradually increasing the depth of the squat but take care not to aggravate your knee pain.


 Stretches

How Can I Tell if my Muscles are Tight?

Knee stretches are a great way to reduce knee pain and reduce the risk of injur
The best way to tell if muscle tightness is causing or contributing to your pain is to see a physical therapist who can fully assess you. However there are some simple tests you can try at home that will give you an indication of any tightness.

Are My Hamstrings Tight?

1) Simplest – When standing, try and touch your toes whilst keeping your knee straight. If you can, you probably don’t have tight hamstrings, if you can’t then you probably need Hamstring stretches
2) More specific – Lie on your back and lift your leg up so your hip is bent 90°. Then, keeping your hip still, raise your foot and straighten your knee as much as you can. A woman should be able to get her knee within 20° of fully straight, and a man within 30°. If you can’t get your knee that straight, you most likely have tight hamstrings

Are My Quads Tight?

1) Simplest – lie on your tummy on a firm surface. Bring your heel towards your bottom. If you can touch your bottom with your foot (or nearly can) your quads are probably fine. If you can’t, they are probably tight and would benefit from Quads stretches
2) More specific – Sit on the bottom edge of a bed. Hug your good knee into your chest, leaving your other leg relaxed. Slowly lean backwards until you are lying down on your back (still hugging your good leg). Let your free leg relax and hang down off the bed and see how much the knee bends (without you pushing it). If it bends less than 90° (a right angle), you probably have tight quads

Getting the Best Results 

This is a case where it really is "no pain, no gain". Stretching effectively should be moderately uncomfortable (i.e. slightly unpleasant!) when you do it, but only in the muscle being stretched and the pain should stop as soon as you stop stretching.
If you feel nothing or only slight discomfort when stretching, the exercise will likely not be very effective – you need to push it a bit further. However, if you have damaged a muscle e.g. hamstring tear, you should NOT start stretching too early – wait until you can use the muscle without pain before starting knee stretches.


How Much Should I Stretch?

It is really important to stretch safely and effectively with any knee problem.
There has been lots of research into the most effective way to stretch i.e. the minimum effort for the maximum benefit and the conclusion is:
• Hold the stretch for 30 seconds
• Repeat the stretch 3 times
• Do the exercise 1-2 times daily


How Do I Do Knee Stretches?

To find out how to do knee stretches for different muscles, choose from the links below:
1) Quads Stretches: for tight muscles at the front of your thigh
2) Hamstring Stretches: to stretch the muscles on the back of your thigh
3) Calf Stretches: for the muscles on the back of your lower leg
4) Glutes Stretches: to stretch you buttock muscles
5) ITB Stretches: stretch the iliotibial band on the outside of your leg from hip to knee
Stretching exercises have been proven to help decrease knee pain and reduce the chance of injury.


Chondromalacia Patella


Chondromalacia patella is when there is softening and damage to the cartilage on the back of the patella (kneecap). This leads to front knee painswelling and clicking/grinding noises when moving the knee.
It tends to affect young, healthy and often sporty people. It most commonly affects adolescents and young adults, and is more common in women. It is commonly misdiagnosed as Runners Knee.
To fully understand Chondromalacia Patellae we first need to understand how the kneecap (patella) normally works. The patella is a small bone that sits inside the muscles at the front of the thigh (quads). It rests in a special groove (patella groove) on the front of the thigh bone (femur) where it moves up and down as you move your leg.
The patella is lined with the thickest cartilage in the whole body which:
1) ensures that the patella glides smoothly over the knee bones
2) works as a shock absorber

Causes of Chondromalacia Patella

Chondromalacia Patella occurs when there is softening and damage to the cartilage lining the back of the kneecap.
Chondromalacia patella occurs when the kneecap rubs against the bones rather than gliding over them. This causes small tears in the cartilage which get inflamed and cause pain. There are a number of reasons for this:
1) Muscle imbalance: a combination of muscle tightness in the quads muscles and other structures e.g. the retinaculum on the outside of the knee and muscle weakness on the inside of the knee (VMO) affects the position of the kneecap in the patella groove. Instead of gliding easily up and down the centre of the groove, it is pulled out to the side which causes a lot of friction and ends up damaging the cartilage. This is also known as patella maltracking. The good news is that it can easily be fixed with the right exercises
2) Poor alignment of the kneecap: where the patella doesn’t sit in the right position, but tends to be either too high or too low. Some people are born this way, but it doesn’t become apparent until adolescence
3) Overuse of the leg: Anything whereby lots of force goes through the knee (e.g. running, jumping, twisting)
4) Flat feet: this changes the way the forces are distributed through the knee and makes the cartilage more prone to damage

Chondromalacia Patellae Symptoms

The most common symptoms of Chondromalacia Patella are:
1) Front Knee Pain: tends to be achy rather than sharp
2) Pain On Stairs: tends to worse going downstairs rather than upstairs
3) Pain After Prolonged Rest: when you first get up after sitting down for a while
4) A grating/grinding sensation: when moving the leg (crepitus)
5) Minor Swelling: usually around the patella
6) Tenderness: with any pressure through the kneecap

How is it Diagnosed?

Skyline view showing the back of the patella
Your doctor will normally diagnose patella chondromalacia from your description of symptoms and by carrying out some simple tests (looking at the movement of the knee, and putting pressure through it).
Standard x-rays don’t usually show up the problem, although a “skyline view x-ray” taken from the side of the leg can be used to see the back of the kneecap. MRI scans are occasionally used to confirm diagnosis. 

Treatment Options

To treat chondromalacia patellae it is vital to discover what is causing the problem in the first place, so your doctor should refer you to a physiotherapist who will look more closely at your leg muscles.  Treatment may include:
1) Exercises: Kneecap exercises and stretches can really help with chondromalacia as well as general strengthening exercises. They all help to combat any muscle imbalance and improve how the kneecap moves. I have never known anyone with chondromalacia patella who has not had muscle imbalance
Knee straps can help reduce the pain associated with Chondromalacia Patella
2) Knee Brace Straps: Wearing a strap directly under the kneecap helps take pressure off the joint, dramatically reducing pain. They are simple to use and very effective. Visit the knee strap section to find the best strap for you
3) PRICE: Protect, Rest, Ice, Compress, Elevate. This helps reduce pain and swelling and can speed up recovery. Visit the PRICE section to find out how to use it safely and effectively
Medication can help reduce the pain and swelling associated with chondromalacia patella
4) Medication: Non-steroidal anti-inflammatories (NSAID’s) such as ibuprofen will help to relieve inflammation and pain
5) Ice: Using ice regularly and before and after activity can help reduce swelling and pain 
6) Taping: Can help to take the pressure off the kneecap. This is particularly useful for when you are playing sports. A physical therapist can teach you how to do this
7) Modifying your Activity: Limit running and instead try swimming or cycling. If you want to run, ensure you are wearing good shoes with cushioned shoes, and stay off hard surfaces e.g. concrete
8) Shoe Insoles: Insoles known as orthotics can help to correct flat feet and reduce the force through the kneecap
9) Knee Pads: Gel Pads are an excellent way to reduce pain and irritation when you do have to kneel
10) Surgery: This is only considered if nothing else works and the pain is really affecting you. It is done arthroscopically, where they make 2-3 small holes around the knee and insert a camera. They will then cut any tight ligaments to allow the patella to sit in the right place in the groove and/or shave off any damaged bits of cartilage.

Recovery Process

Chondromalacia Patellae usually settles down with medication and exercises but it is likely to take a few months. The sooner you get going with exercises, the sooner it will get better. Check out the strengthening exercises and stretches sections for exercises you can do at home to help. Surgery is rarely necessary.

Common Misdiagnosis

Front knee pain is commonly misdiagnosed as chondromalacia patellae when it isn’t. Another common cause of similar pain is Runners Knee (aka Anterior Knee Pain or Patellofemoral Pain). While the symptoms can be similar, there is not the softening and damage to the cartilage that is characteristic of chondromalacia patella. Treatment is however similar for both conditions.  You can find out more in the Runners Knee section.

What are shin splints?


Shin Splints (Medial Tibial Tenoperiostitis) is a condition characterized by damage and inflammation of the connective tissue joining muscles to the inner shin bone (tibia).
There are several muscles which lie at the back of your lower leg and are collectively known as the calf muscles (figure 1). Several of these muscles lie deep within the calf (tibialis posterior, flexor digitorum longus, flexor hallicus longus and soleus) and attach to the inner border of the shin bone (tibia). The connective tissue responsible for attaching these muscles to the tibia is known as the tenoperiosteum. Every time the calf contracts, it pulls on the tenoperiosteum. When this tension is too forceful or repetitive, damage to the tenoperiosteum occurs. This results in inflammation and pain and is known as medial tibial tenoperiostitis – commonly referred to as shin splints.
Medial tibial tenoperiostitis can sometimes occur in combination with other pathologies that cause shin pain such as compartment syndrome and tibial stress fractures.

Causes of shin splints

Shin splints most commonly occur due to repetitive or prolonged activities placing strain on the tenoperiosteum. This typically occurs due to excessive walking, running or jumping activities (such as an increase in training or running) and is often seen in runners and footballers. It frequently occurs in association with calf muscle tightness or biomechanical abnormalities, such as excessive pronation (flat feet – figure 2) or supination (high arch) or in those with inappropriate footwear. Athletes more commonly develop this condition early in the season following a period of reduced activity (deconditioning) and when training surfaces are generally harder.

Signs and symptoms of shin splints

Patients with shin splints typically experience pain along the inner border of the shin. In less severe cases, patients may only experience an ache or stiffness along the inner aspect of the shin that increases with rest (typically at night or first thing in the morning) following activities which place stress on the tenoperiosteum. These activities typically include excessive walking, running (especially up hills, on uneven surfaces or in poor footwear such as thongs), jumping and general weight bearing activity. The pain associated with this condition may also warm up with activity in the initial stages of injury. As the condition progresses, patients may experience symptoms that increase during sport or activity, affecting performance. In severe cases, patients may walk with a limp although this may also reduce to some extent as the patient warms up.
Patients with this condition typically experience pain on firmly touching the inner border of the shin bone particularly along the lower third of the bone. Areas of muscle tightness, thickening or lumps may also be felt in the area of pain. In severe cases, swelling, redness and warmth may also be present.

Diagnosis of shin splints

A thorough subjective and objective examination from a physiotherapist is usually sufficient to diagnose shin splints. Occasionally, further investigations such as an X-ray, ultrasound, bone scan, CT scan, MRI or compartment pressure testing may be used to assist diagnosis and rule out other conditions, such as compartment syndrome or tibial stress fractures.

Treatment for shin splints

For detailed physiotherapy information on the treatment of this condition'Become a Member'.

Already a Member?


View the complete article - Shin Splints (Members Only).

Prognosis of shin splints

Most patients with this condition heal well with appropriate treatment. Recovery time may range from a few weeks to many months depending on the severity of injury, quality of treatment and length of time the injury has been present for. Patients with shin splints that have been present for months may require a considerable period of treatment associated with reduced activity before full recovery occurs.

Contributing factors to the development of shin splints

There are several factors which can predispose patients to developing this condition. These need to be assessed and corrected with direction from a physiotherapist. Some of these factors include:
  • excessive training or activity
  • poor foot posture (especially flat feet – figure 2)
  • inappropriate footwear
  • inadequate warm up
  • training on hard or inappropriate surfaces
  • muscle weakness (especially the calf muscles)
  • tightness in specific joints (such as the ankle)
  • tightness in specific muscles (especially the calfs)
  • poor lower limb biomechanics
  • poor training technique or methods
  • leg length differences
  • poor balance
  • being overweight
  • deconditioning
  • poor core stability

Physiotherapy for shin splints

Physiotherapy treatment for patients with this condition is vital to hasten the healing process, ensure an optimal outcome and reduce the likelihood of recurrence. Treatment may comprise:
  • deep tissue massage (particularly to the calf muscles)
  • joint mobilization
  • dry needling
  • electrotherapy
  • PNF stretches
  • arch support taping
  • the use of orthotics or shock absorbing insoles
  • the use of crutches
  • biomechanical correction
  • ice or heat treatment
  • progressive exercises to improve flexibility (especially of the calf muscles), balance, strength and core stability
  • activity modification advice
  • anti-inflammatory advice
  • footwear advice
  • weight loss advice where appropriate

Other intervention for shin splints

Despite appropriate physiotherapy management, some patients with shin splints do not improve. When this occurs the treating physiotherapist or doctor can advise on the best course of management. This may include pharmaceutical intervention, further investigations such as X-rays, bone scan, CT scan, MRI, or compartment pressure testing, or a referral to an orthopaedic specialist who will advise on any procedures that may be appropriate to improve the condition. A review with a podiatrist may also be indicated for the prescription of orthotics to correct any foot posture abnormalities.

Exercises for shin splints

The following exercises are commonly prescribed to patients with this condition. You should discuss the suitability of these exercises with your physiotherapist prior to beginning them. Generally, they should be performed 2 - 3 times daily and only provided they do not cause or increase symptoms.
Your physiotherapist can advise when it is appropriate to begin the initial exercises and eventually progress to the intermediate and advanced exercises. As a general rule, addition of exercises or progression to more advanced exercises should take place provided there is no increase in symptoms.

Initial Exercises

Calf Stretch with Towel

Begin this stretch in long sitting with your leg to be stretched in front of you. Your knee and back should be straight and a towel or rigid band placed around your foot as demonstrated (figure 3). Using your foot, ankle and the towel, bring your toes towards your head until you feel a stretch in the back of your calf, Achilles tendon or leg. Hold for 5 seconds and repeat 10 times at a mild to moderate stretch provided the exercise is pain free.
Exercises for Shin Splints - Calf Stretch with Towel
Figure 3 - Calf Stretch with Towel

Resistance Band Calf Strengthening

Begin this exercise with a resistance band around your foot as demonstrated and your foot and ankle held up towards your head (figure 4). Slowly move your foot and ankle down against the resistance band as far as possible and comfortable without pain, tightening your calf muscle. Very slowly return back to the starting position. Repeat 10 – 20 times provided the exercise is pain free.
Exercises for Shin Splints - Resistance Band Calf Strengthening
Figure 4 – Resistance Band Calf Strengthening (left calf)

What is compartment syndrome?


Compartment syndrome is a condition characterized by a variety of symptoms (such as pain and muscle tightness) which occur in the lower leg as a result of exercise-induced muscle swelling and a subsequent increase in local tissue pressure.
There are several muscles which lie at the back of the lower leg and are collectively known as the calf muscles (figure 1). Several of these muscles lie deep within the calf (flexor hallicus longus, flexor digitorum longus and tibialis posterior) and are enveloped in a layer of connective tissue (fascia) which encloses them, therefore forming a compartment. This compartment is known as the deep posterior compartment.
Occasionally, the compartments' enveloping layer of connective tissue becomes tight and inflexible resulting in an increase in pressure within the compartment. This may be due to an inflammatory process whereby the connective tissue loses its elasticity. In addition, activity requiring repeated use of muscles within the deep posterior compartment (such as running) results in a local increase in blood flow, causing the muscles to swell. Subsequently, the pressure within the compartment may increase excessively during activity resulting in a variety of lower leg symptoms such as tightness, pain, weakness, pins and needles or numbness. When this occurs, the condition is known as deep posterior compartment syndrome.
Occasionally, compartment syndrome may occur in combination with other conditions that cause shin pain such as shin splints and stress fractures.

Causes of compartment syndrome

Compartment syndrome is usually associated with overuse (such as a sudden increase in training or running) and is often seen in runners and footballers. It frequently occurs in association with calf muscle tightness, an increase in calf muscle size or biomechanical abnormalities, such as excessive pronation (flat feet – figure 2) or, less commonly, supination (high arch). Patients often develop this condition early in the season following a period of reduced activity (deconditioning) and when training surfaces are generally harder.

Signs and symptoms of compartment syndrome

Patients with deep posterior compartment syndrome typically experience pain and tightness along the inner aspect of the shin and / or back of the lower leg. Symptoms generally increase with exercise and decrease with rest and can occur in one or both legs.
Patients with this condition may experience an ache, tightness or bursting sensation that can progress to chronic calf pain with excessive activity. In severe cases, patients may experience weakness, pins and needles in the foot, numbness or a 'dead' feeling in the leg that develops with ongoing activity. Usually symptoms will disappear relatively quickly upon resting.
Patients usually do not experience pain on firmly touching the affected area, however, if other conditions are present, such as shin splints, there may be tenderness along the inner border of the shin bone. Areas of muscle tightness, thickening or lumps may also be detected in the area of pain.

Diagnosis of compartment syndrome

A thorough subjective and objective examination from a physiotherapist is usually sufficient to diagnose compartment syndrome. Compartment pressure testing can be used to confirm the diagnosis and identify the exact muscle compartment involved. Investigations such as an X-ray, bone scan, CT scan or MRI may sometimes also be used to assist with diagnosis and exclude the presence of other pathologies.

Treatment for compartment syndrome

Most cases of compartment syndrome settle well with appropriate physiotherapy. This requires careful assessment by the physiotherapist to determine which factors have contributed to the development of the condition, with subsequent correction of these factors. Soft tissue massage and stretches to address muscle tightness play a large role in treatment, along with biomechanical assessment and correction to address any foot posture issues.
The success rate of treatment for patients with this condition is largely dictated by patient compliance. One of the key components of treatment is that the patient rests sufficiently from ANY activity that increases their pain until they are symptom free. Once pain free, a gradual return to activity is indicated provided there is no increase in symptoms.
Ignoring symptoms or adopting a 'no pain, no gain' attitude is likely to lead to the problem becoming chronic. Immediate, appropriate treatment in patients with compartment syndrome is essential to ensure a speedy recovery. Once the condition is chronic, healing slows significantly resulting in markedly increased recovery times.
Activities placing minimal stress on the lower leg may be performed to maintain fitness. These include hydrotherapy exercises or swimming in a pool, upper body weights in sitting or lying or sometimes cycling.
Deep tissue massage to the calf muscles can be a very effective way of treating compartment syndrome and should form part of the rehabilitation program. Patients should also perform pain-free flexibility and strengthening exercises as part of their rehabilitation to ensure an optimal outcome.
In the final stages of treatment, once pain has been controlled and contributing factors have been addressed, a graduated return to activity or sport can occur as guided by a physiotherapist.
If conservative treatment fails, surgery may be indicated to reduce the pressure within the muscle compartment. This procedure involves removal of the connective tissue surrounding the muscles to allow greater room for the muscles to swell during activity without causing symptoms.

Prognosis of compartment syndrome

Most patients with compartment syndrome can recover with appropriate treatment. Recovery time may range from a few weeks to many months depending on the severity of injury, quality of treatment and length of time the injury has been present for. Patients with compartment syndrome that have been present for months may require a considerable period of treatment associated with reduced activity before full recovery can occur.

Contributing factors to the development of compartment syndrome

There are several factors which can predispose patients to developing compartment syndrome. These need to be assessed and corrected with direction from a physiotherapist. Some of these factors include:
  • excessive training or activity
  • poor foot posture (especially flat feet)
  • inappropriate footwear
  • training on hard surfaces
  • muscle weakness (especially the calf muscles)
  • tightness in specific joints (such as the ankle)
  • tightness in specific muscles (especially the deep calf muscles)
  • muscle strength imbalances
  • an increase in calf muscle size
  • poor lower limb biomechanics
  • poor training technique or methods
  • leg length differences
  • being overweight
  • deconditioning
  • fatigue
  • past injury or scarring to the fascia

Physiotherapy for compartment syndrome

Physiotherapy treatment for compartment syndrome is vital to ensure an optimal outcome. Treatment may comprise:
  • soft tissue massage (particularly to the deep calf muscles)
  • mobilization (of the ankle joint)
  • dry needling
  • electrotherapy
  • PNF stretches
  • arch support taping
  • the use of orthotics
  • biomechanical correction
  • progressive exercises to improve flexibility (especially of the deep calf muscles), balance and strength
  • activity modification advice
  • footwear advice
  • weight loss advice where appropriate
  • a gradual return to activity program

Other intervention for compartment syndrome

Despite appropriate physiotherapy management, some patients with compartment syndrome do not improve. When this occurs the treating physiotherapist or doctor can advise on the best course of management. This may include further investigations such as X-rays, bone scan, CT scan, MRI, or compartment pressure testing, or a referral to an orthopaedic specialist. In the event that conservative treatment has failed, and, compartment pressure testing is positive, surgery may be indicated to reduce the pressure within the compartment. A review with a podiatrist may also be indicated for the prescription of orthotics to correct any foot posture abnormalities.

Exercises for compartment syndrome

The following exercises are commonly prescribed to patients with this condition. You should discuss the suitability of these exercises with your physiotherapist prior to beginning them. Generally, they should be performed 3 times daily and only provided they do not cause or increase symptoms.

Lunge Stretch

With your hands against the wall, place your leg to be stretched in front of you as demonstrated (figure 3). Keep your heel down. Gently move your knee forward over your toes until you feel a stretch in the back of your calf or Achilles tendon. Hold for 15 seconds and repeat 4 times at a mild to moderate stretch pain-free.
Lunge Stretch
Figure 3 – Lunge Stretch (right leg)

Calf Stretch

With your hands against the wall, place your leg to be stretched behind you as demonstrated (figure 4). Keep your heel down, knee straight and feet pointing forwards. Gently lunge forwards until you feel a stretch in your calf / knee of your back leg. Hold for 15 seconds and repeat 4 times at a mild to moderate stretch pain-free.
Calf Stretch
Figure 4 – Calf Stretch (left leg)

Physiotherapy products for compartment syndrome

Some of the most commonly recommended products by physiotherapists to hasten healing and speed recovery in patients with this condition include:
  1. Massage Balls & Foam Rollers (for self massage)